Quantcast
Channel: Chaminda's DevOps Journey with MSFT
Viewing all 342 articles
Browse latest View live

Card Style Rules - VSO

$
0
0
Visual Studio Online recently added with some amazing set of features. Capability to apply styles based on rules to a card on Kanban board is one such feature.
The style for card can be set on Backlog or Task boards, by clicking settings.
image
In the popup window select the styles tab. Then you can setup style rules similar to below.
image
In the above rule is set to color the card in reddish if the Bug is Critical.
Board shows Rule in action.
image
If bug is set to different Severity.
image
image

Multiple rules can be added and rules can be enabled disabled.
image
image
This will add lot of value to daily scrums, and in other team meetings, since board now effectively showing
  • Items require immediate attention like Critical bugs.
  • Task or Stories not attended for some time.
  • A User Story/PBI that is changed after work started on iteration.
and much more as you can imagine..
For TFS on premise, these will be available in future updates to TFS2015.

Change Release Management Server URL in Release Management Client (Resolve “The Release Management Server is not currently available. ”)

$
0
0
Setting up Release Management Server URL in Release Management Client should be done when it is set up initially. In an already configured client, it is possible to change the URL of the server, in Administration tab like shown below.
image image image
If the configured server is not accessible, the client will show error,
“The Release Management Server is not currently available. If the problem persists please contact your administrator. The application will now close.”
image
Since the client is getting closed when OK button is clicked, it is not possible to change the server URL in the Release Management client.
In Release Management 2013, generally following path contains the file (Microsoft.TeamFoundation.Release.Data.dll.config) containing the server URL.
C:\Program Files (x86)\Microsoft Visual Studio 12.0\Release Management\Client\bin
image
It is possible to manually edit the “Microsoft.TeamFoundation.Release.Data.dll.config” file, and URL needs to be set in multiple locations in this file.
image
There is easier option to do this with RM server 2013 update 2 onwards. That is by using the “ReleaseManagementConsoleAdjustConfigFile.exe” in the same folder (C:\Program Files (x86)\Microsoft Visual Studio 12.0\Release Management\Client\bin).
image
Two parameters are required to be passed to this executable to set the new URL for the release management client.
  • configfilename  config file name that is Microsoft.TeamFoundation.Release.Data.dll.config
  • newwebserverurl New RM Server URL
Example command below.

ReleaseManagementConsoleAdjustConfigFile.exe -configfilename .\Microsoft.TeamFoundation.Release.Data.dll.config -newwebserverurl http://YourRMServer:1000

This command should be run in Administrative command prompt.

image

The command updates the “Microsoft.TeamFoundation.Release.Data.dll.config” file.

image

When the correct URL is set the RM Client can connect to RM server.

image

Change RM Deployment Agent Temp Download Path – Resolve “The specified path, file name, or both are too long”

$
0
0
In an agent based release template, when the build output is downloaded to with a components using XCopy tool, the error below might be encountered, if there is web sites or projects, containing a lot of folder hierarchy and long file/folder names.
The specified path, file name, or both are too long. The fully qualified file name must be less than 260 characters, and the directory name must be less than 248 characters.
image
Shortening the Installation Path, not helped to resolve the problem. Manually downloading build output to this path, did not have file name paths exceeding the limit.
image
The issue occurred since deployment agent initially downloads build output to a temporary location. The default path is below.
C:\Users\<UserNameForDeploymenyAgent>\AppData\Local\Temp\ReleaseManagement\<ComponentName>\<VersionNumber>
image
To change this path there is no special configuration found anywhere in the Deployment Agent installation folder. None of the config files contain information on this path.
image
How to Resolve
This download path can be changed by, changing the Release Management Deployment Agent Service, running users Temp folder locations in environment variables.
image image
Change it to a shorter path.
image
Restart the “Microsoft Deployment Agent” service. Now the deployment agent successfully downloads the files without path limit exceeding error, using the new Temp path.
image
Build output is getting downloaded to installation path defined.
image

Release Stopped while Deployment Task - Communication with the deployer was lost during the deployment.

$
0
0
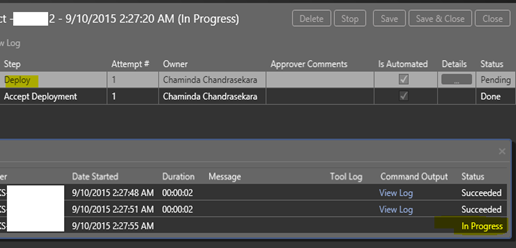
What happens if a release a VS Release Management agent based release is stopped, while a deployment action is pending?
1
2
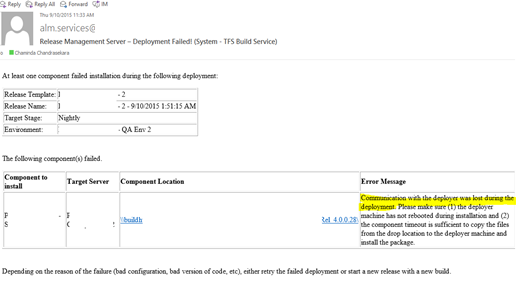
Release stopped and following message received.
Communication with the deployer was lost during the deployment. Please make sure (1) the deployer machine has not rebooted during installation and (2) the component timeout is sufficient to copy the files from the drop location to the deployer machine and install the package.
3
Worst is when the next release is triggered the first action is staying in pending state for ever. It not proceeding not failing.
How to resolve?
Go to the target machine and restart the deployment agent. Release actions comes alive.
4
The above error “Communication with the deployer was lost during the deployment.” can occur in few other situations. Few helpful links below.
http://blogs.blackmarble.co.uk/blogs/rfennell/post/2014/05/01/Release-Management-components-fail-to-deploy-with-a-timeout-if-a-variable-is-changed-from-standard-to-encrypted.aspx
http://blogs.blackmarble.co.uk/blogs/rfennell/post/2014/09/18/Communication-with-the-deployer-was-lost-during-deployment-error-with-Release-Management.aspx
https://social.msdn.microsoft.com/Forums/expression/en-US/c633f125-b323-4d1c-8206-a14e6250e0c3/release-management-deploying-components-failing-since-update-2?forum=tfsbuild

Get a Build Note Between Given Two Builds Using PowerShell

$
0
0

A build associates work items from last good build to the current successful build. What if you want to find the associated work items between two builds, while having other successful builds in the middle.

image

Below script supports that. This is developed based on previous post script “Send Custom Build Notes with TFS Build Using PowerShell”.


  1
2
3
4
5
6
7
8
9
10
11
12
13
14
15
16
17
18
19
20
21
22
23
24
25
26
27
28
29
30
31
32
33
34
35
36
37
38
39
40
41
42
43
44
45
46
47
48
49
50
51
52
53
54
55
56
57
58
59
60
61
62
63
64
65
66
67
68
69
70
71
72
73
74
75
76
77
78
79
80
81
82
83
84
85
86
87
88
89
90
91
92
93
94
95
96
97
98
99
100
101
102
103
104
105
106
107
108
109
110
111
112
113
114
115
116
117
118
119
120
121
122
123
124
125
126
127
128
$tfsCollectionUrl = "http://yourtfsserver:8080/tfs/yourcollection"
$teamProject = "yourteamproject"
$versionControlPath = "$/yourteamproject/versioncontrolpath"
$buildDefinition = "yourbuilddefinitionname"
$fromBuildNumber = "frombuildnumber"
$toBuildNumber = "tobuildnumber"
$workItemStates = @("Resolved") # @("Resolved","New", "Active") @("Resolved") @("All")
$Recipients = @("user1@yourcompany.com","user2@yourcompany.com")
$EmailSender
= "sender@yourcompany.com"
$SMTPserverName = "smtpservername"

[void][System.Reflection.Assembly]::LoadWithPartialName("Microsoft.TeamFoundation.Client")
[void][System.Reflection.Assembly]::LoadWithPartialName("Microsoft.TeamFoundation.Common")
[void][System.Reflection.Assembly]::LoadWithPartialName("Microsoft.TeamFoundation.Build.Client")
[void][System.Reflection.Assembly]::LoadWithPartialName("Microsoft.TeamFoundation.Build.Common")
[void][System.Reflection.Assembly]::LoadWithPartialName("Microsoft.TeamFoundation.VersionControl.Client")
[void][System.Reflection.Assembly]::LoadWithPartialName("Microsoft.TeamFoundation.VersionControl.Client.VersionSpec")
[void][System.Reflection.Assembly]::LoadWithPartialName("Microsoft.TeamFoundation.WorkItemTracking.Client")


$server = new-object Microsoft.TeamFoundation.Client.TfsTeamProjectCollection(New-Object Uri($tfsCollectionUrl))
$buildServer = $server.GetService([Microsoft.TeamFoundation.Build.Client.IBuildServer])

$fromBuild = $buildServer.QueryBuilds($teamProject, "CPO.Rel") | where { $_.BuildNumber -eq$FromBuildNumber }
$toBuild = $buildServer.QueryBuilds($teamProject, "CPO.Rel") | where { $_.BuildNumber -eq$toBuildNumber }

$versionControlServer = $server.GetService([Microsoft.TeamFoundation.VersionControl.Client.VersionControlServer])
$workItemStore = $server.GetService([Microsoft.TeamFoundation.WorkItemTracking.Client.WorkItemStore])
$LinkingService = $server.GetService([Microsoft.TeamFoundation.Client.TswaClientHyperlinkService])

$fromChangesetVersionSpec = New-Object Microsoft.TeamFoundation.VersionControl.Client.ChangesetVersionSpec($fromBuild.SourceGetVersion.Substring(1))
$toChangesetVersionSpec = New-Object Microsoft.TeamFoundation.VersionControl.Client.ChangesetVersionSpec($toBuild.SourceGetVersion.Substring(1))

$recursionType = [Microsoft.TeamFoundation.VersionControl.Client.RecursionType]::Full

$historyBetweenBuilds = $versionControlServer.QueryHistory($versionControlPath, $toChangesetVersionSpec, 0, $recursionType, $null, $fromChangesetVersionSpec, $toChangesetVersionSpec,[Int32]::MaxValue, $true, $false)
$workItemsBetweenBuilds = $historyBetweenBuilds | foreach-object {$_.workitems}

$tabName = "WorkItemTable"

#Create Table object
$WorkItemTable = New-Object system.Data.DataTable $tabName

#Define Columns
$colWorkItemType1 = New-Object system.Data.DataColumn WorkItemType,([string])
$colId = New-Object system.Data.DataColumn Id,([int])
$colTitle = New-Object system.Data.DataColumn Title,([string])
$colState = New-Object system.Data.DataColumn State,([string])
$colAssignedTo = New-Object system.Data.DataColumn AssignedTo,([string])
$colWILink = New-Object system.Data.DataColumn WILink,([string])

#Add the Columns
$WorkItemTable.columns.add($colWorkItemType1)
$WorkItemTable.columns.add($colId)
$WorkItemTable.columns.add($colTitle)
$WorkItemTable.columns.add($colState)
$WorkItemTable.columns.add($colAssignedTo)
$WorkItemTable.columns.add($colWILink)

$workItemsBetweenBuilds |
foreach-object {
if ($_.Type.Name -eq"Task")
{
# Get parent work item of task
foreach($linkin$_.WorkItemLinks)
{
if ($link.LinkTypeEnd.Name -eq"Parent")
{
$ParentWorkItem = $workItemStore.GetWorkItem($link.TargetId)

if (($workItemStates-contains$ParentWorkItem.State) -or ($workItemStates-contains"All"))
{
#Create a row
$row = $WorkItemTable.NewRow()

#Enter data in the row
$row.WorkItemType = $ParentWorkItem.Type.Name
$row.Id = $ParentWorkItem.Id
$row.Title = $ParentWorkItem.Title
$row.State = $ParentWorkItem.State
$row.AssignedTo = $ParentWorkItem.Fields["Assigned To"].Value
$row.WILink = $LinkingService.GetArtifactViewerUrl($ParentWorkItem.Uri).AbsoluteUri

#Add the row to the table
$WorkItemTable.Rows.Add($row)
}

break
}
}
}
else
{
# Adding associated work item other than task

if (($workItemStates-contains$_.State) -or ($workItemStates-contains"All"))
{
#Create a row
$row = $WorkItemTable.NewRow()

#Enter data in the row
$row.WorkItemType = $_.Type.Name
$row.Id = $_.Id
$row.Title = $_.Title
$row.State = $_.State
$row.AssignedTo = $_.Fields["Assigned To"].Value
$row.WILink = $LinkingService.GetArtifactViewerUrl($_.Uri).AbsoluteUri

#Add the row to the table
$WorkItemTable.Rows.Add($row)
}
}

}

$style = "<style>BODY{font-family: Arial; font-size: 10pt;}"
$style = $style + "TABLE{border: 1px solid black; border-collapse: collapse;}"
$style = $style + "TH{border: 1px solid black; background: #dddddd; padding: 5px; }"
$style = $style + "TD{border: 1px solid black; padding: 5px; }"
$style = $style + "</style>"

#$WorkItemTable |sort WorkItemType,Id -Unique | Select-Object WorkItemType, Id, State, Title, AssignedTo, WILink | ConvertTo-HTML -head $style | Out-File "$PSScriptRoot\tmpBuildNote.txt"

#$messageBody = Get-Content "$PSScriptRoot\tmpBuildNote.txt" | Out-String

$messageBody = $WorkItemTable |sort Id -Unique |sort WorkItemType,State | Select-Object WorkItemType, Id, State, Title, AssignedTo, WILink | ConvertTo-HTML -head $style | Out-String

Send-MailMessage -From $EmailSender -To $Recipients -SmtpServer $SMTPserverName -Body $messageBody -Subject "$toBuildNumber Build Notes from $fromBuildNumber" -BodyAsHtml

With set to get only Resolved state work items, this will send a build note with, User Stories/PBIs, Bugs which are associated with the changesets of the in between builds.


image image


If State is set to All, all state work items are sent.imageimage


Multiple state values can be specified as below.imageimage

Resolve Common Errors - Run Automated Tests with VS Release Management 2013

$
0
0

There is a tool available in Release Management 2013 to execute automated tests, once the deployment completes. image
image
How to setup this is well explained in article here. http://nakedalm.com/execute-tests-release-management-visual-studio-2013/
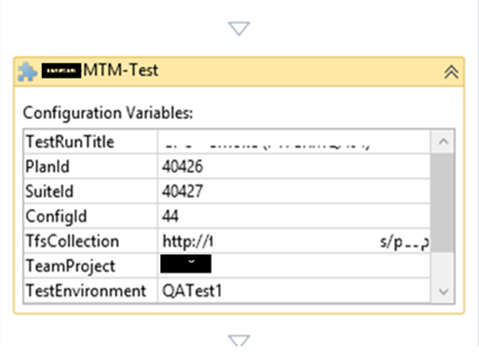
With the custom component set as below in release template, you should be able to excute tests.image
Below are few issues you might encounter, and steps to fix them.
*******************************************************************************************************
Error 01:
Cannot process argument transformation on parameter
'PlanId'. Cannot convert value "40426" to type "System.Int16". Error: "Value was either too large or too small for an Int16."  Unfortunately this error comes with the component reporting a “succeed”. But log shows the failure. This error is discussed here.
image
This is obvious error if you have more TFS projects and larger IDs for work items above 32767. You would not be able to use the Microsoft provided tool  image
To Resolve:
You need to get the TCM.ps1 from the tool and edit it. Downloading it from RM tools is not possible simply because downloading or any other modification is not available for Microsoft published tools.image
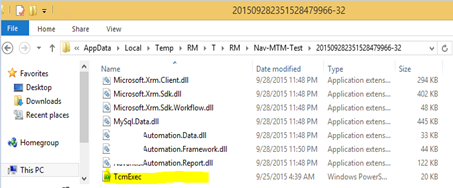
In the deployment agent machine, deployment agent user’s temporary folder (component log contains this path with the error), you can find the file.
C:\RMT\RM\T\RM\XX-MTM-Test\201509241626076897123-31\TcmExec.ps1
In this example users temp path is set to  C:\RMT. Default path is C:\users\username\AppData\Local\Temp\.. as shown below. (More info here) image
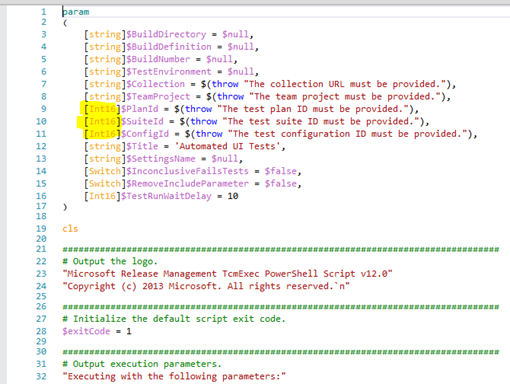
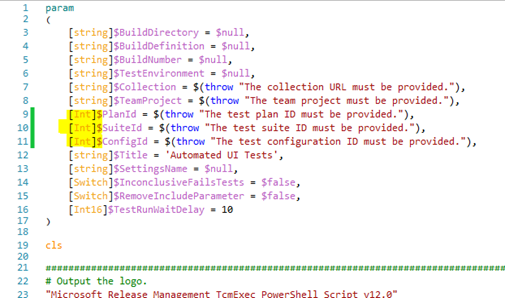
Copy this script and change the Int16 parameters highlighted below to Int.image
image
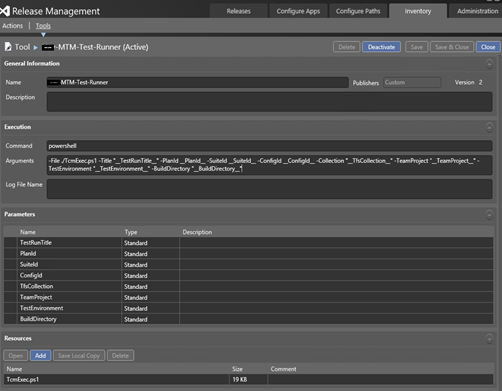
Then create a new tool in Release Management using the powershell script.New MTM RM Tool
Set arguments as follows.
-File ./TcmExec.ps1 -Title "__TestRunTitle__" -PlanId __PlanId__ -SuiteId __SuiteId__ -ConfigId __ConfigId__ -Collection "__TfsCollection__" -TeamProject "__TeamProject__" -TestEnvironment "__TestEnvironment__" -BuildDirectory "__BuildDirectory__"
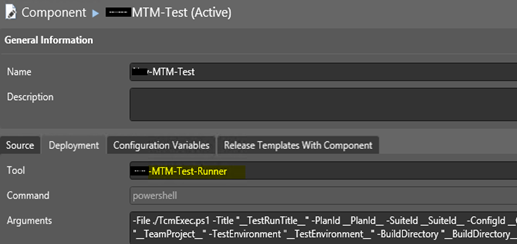
Change the component in the template to use the new tool created, instead of provided “MTM Automated Tests Manager”.image
*******************************************************************************************************
Error 02:
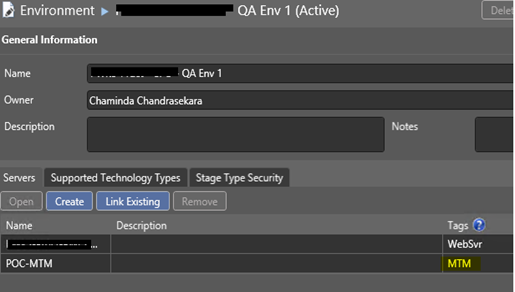
If MTM (Microsoft test Manager)  not available in the deployment server below error occurs.“ERROR: Unable to locate C:\RMT\RM\T\RM\XX-MTM-Test\IDE\TCM.exe”image
To Resolve:
It is mandatory to have MTM(Microsoft test Manager) installed on the server that is initiating the tests. For this purpose separate machine is setup with deployment agent and it is installed with Visual Studio Test Professional 2013. It is not recommended to install Visual Studio in the target deployment server (DevInt/QA/UAT servers should be similar to Production, without having Visual Studio in them). Better option is to keep a separate machine attached to each environment to trigger tests after deployment.image
image
This is used in the Release template to execute tests after deployment.image
*******************************************************************************************************
Error 03:
With new tool test execution failed with below error.
“TF30063: You are not authorized to access http://yourtfs:8080/tfs/collection.” image
To Resolve:
Add the deployment agent user configured in test initiating machine, to the Test Service Users in the relevant project collection.image
*******************************************************************************************************
Error 04:
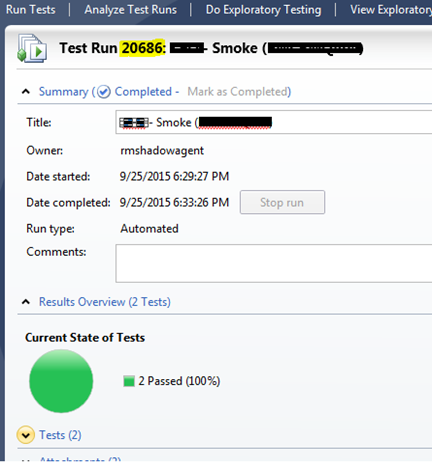
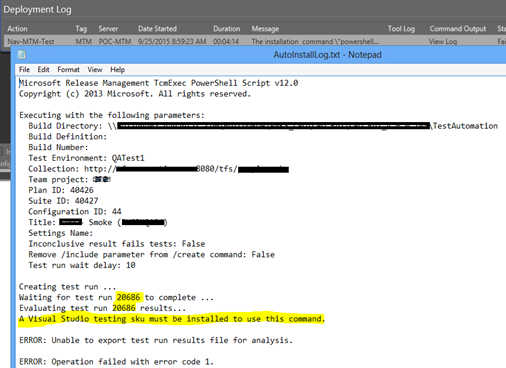
After fixing all above issues, tests initiated after the deployment with release template. image
This time reading results fails with “A Visual Studio testing sku must be installed to use this command.”image
To Resolve:
As discussed in this forum thread only working solution was to install “Visual Studio Ultimate (2013)” in the machine which is acting as deployment agent, triggering the tests using the component in the release template.
*******************************************************************************************************
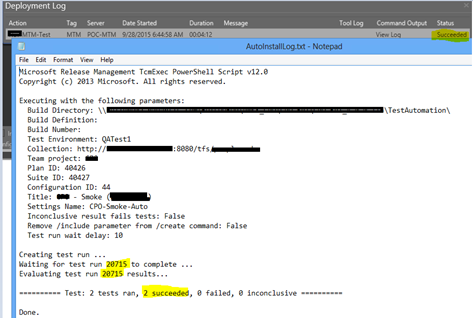
With all above fixed test were executed successfully and results were shown in the tool log.image image

Disable Lock Screen on Windows 8.1 to Prevent - Automation engine is unable to playback the test because it is not able to interact with the desktop.

$
0
0

You might run into below error with automated testing with lab environments.
*******************************************************************************************************Error calling Initialization method for test class xxxxxxxx: Microsoft.VisualStudio.TestTools.UITest.Extension.UITestException: Automation engine is unable to playback the test because it is not able to interact with the desktop.  This could happen if the computer running the test is locked or it’s remote session window is minimized.
*******************************************************************************************************

image
This could be because you have RDP to the test agent machine and you have logged out, minimized the RDP session. This can be prevented by repairing the lab environment and let it restart the test agent machine. Then as long as you do not RDP to test agent it should run automated tests without any issue.image
But if your test agent machine is Windows 8 or Windows 8.1 you might still run into the same error, even though you are 100% certain, that after repairing the lab environment, you have not RDP to the test agent machine.
This happens due to the lock screen functionality of Windows 8 and 8.1. to fix this issue disable the lock screen. This can be done in Group Policy Editor. Run gpedit.msc and set the “Do not display the lock screen” to “Enabled” sate.image
This will set the registry key HKEY_LOCAL_MACHINE\SOFTWARE\Policies\Microsoft\Windows\Personalization with DWord “NoLockScreen” to value 1.image
More information on setting lock screen to disable, can be found here.

Disable the screen saver for Test Agent user.image
Set “Turn off the display” to never.image

In registry set the following DWord “DisableLockWorkstation”. Instructions here.image

More instructions in the answer here. Set and verify all of them.

Repair the lab environment again to make sure the restart of the test agent and, as long as no RDP sessions to the test agent machine, automated test will not run into “Automation engine is unable to playback the test because it is not able to interact with the desktop”.

image

Increase Default Timeout of Copying Test Binaries to Test Client – Allow Release Management to Run Tests with Increased Timeout

$
0
0
Default timeout for downloading test binaries to execute automated tests in a lab environment is 5 minutes. This might not be enough if the test assemblies are high in size, and test client machine is in a different location from the build drop LAN having low bandwidth.
If running via RM server, MTM Test runner, test hangs on active and never get executed.image
trx file opened in Visual Studio Ultimate shows the exact issue.image
*******************************************************************************************************
Warning    9/25/2015 7:27:10 PM    Warning: Test Run deployment issue: The assembly or module 'Microsoft.Xrm.Sdk.Deployment' directly or indirectly referenced by the test container '\\builddrop\testautomation\xxx.automation.nonui.dll' was not found.   
Error    9/25/2015 7:32:15 PM    Agent vstfs:///LabManagement/TestMachine/36 exceeded deployment timeout period.    vstfs:///LabManagement/TestMachine/36
*******************************************************************************************************
How to resolve
The testcontroller deploys the test binaries and their dependencies from the build drop location to the test agent machines so that test agent can run them. The timeout for that activity is called deployment timeout.
Test setting should be created and set the deploy time out in the test settings, following instructions here. The command to execute is below.
UpdateTestSettings /collection:http://abc:8080/tfs/DefaultCollection /teamProject:myProject /settingsname:My2_0_App /bucketSize:200 /deploymentTimeout:600000
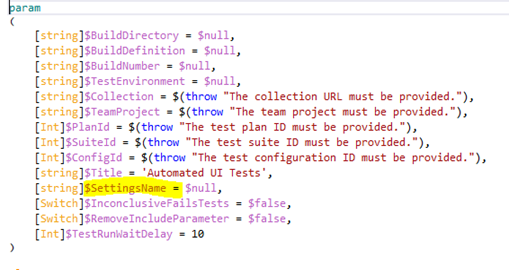
Next step is providing test settings to the test run via the RM server, MTM Test runner. For this TcmExec.ps1 explained here, has a parameter for test settings.0
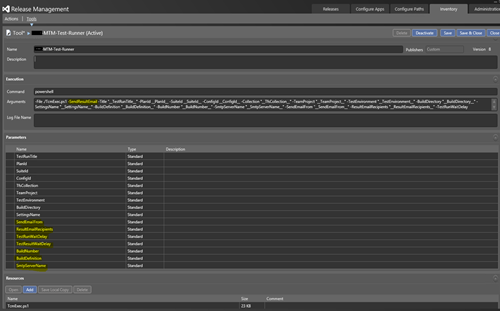
To provide this in the RM tool (custom tool created using the TcmExec.ps1 explained here), add a parameter as shown below.image
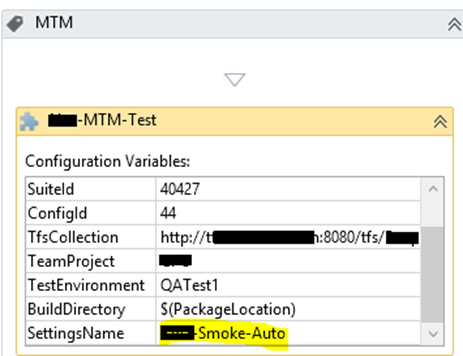
This will not be applied to existing components created with the RM tool. Update them to have the SettingsName parameter.2 image
This allows the SettingsName to be supplied to the test via Release Management Template.4
Test now executes after successfully downloading the test binaries to the test client.image

Send Test Result Email After Running Automated Tests with Release Management

$
0
0
Getting automated tests executed after deployment actions, it self is challenging with release management. Below are some helpful links on “how to overcome them”.
Resolve Common Errors - Run Automated Tests with VS Release Management 2013
Disable Lock Screen on Windows 8.1 to Prevent - Automation engine is unable to playback the test because it is not able to interact with the desktop
Increase Default Timeout of Copying Test Binaries to Test Client – Allow Release Management to Run Tests with Increased Timeout
Once everything in place, with a customized TcmExec.ps1, tests get executed with RM.image
[image%255B87%255D.png]
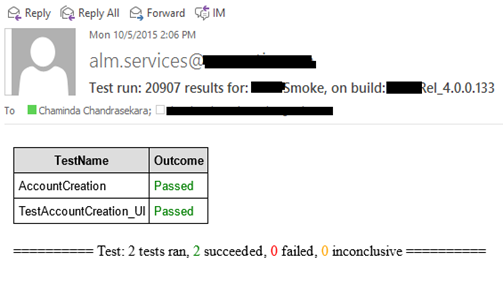
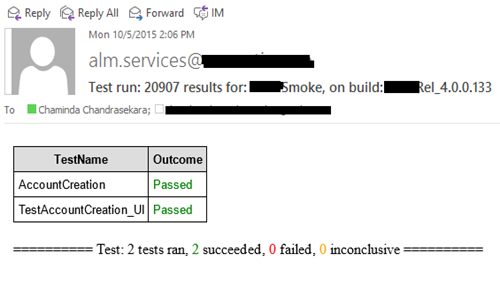
Wouldn’t it be nice to have an email delivered to the team with the test results like shown below?6
To do this it is possible to modify the TcmExec.ps1 (How to get the TcmExec.ps1 is described here), to read the details of the test result file (.trx) and create a formatted email message to sent to the defined recipients. As the first step script is introduced with few more parameters.image
Extract the build number from the build location path given that the build path contains it.This is to make Test result email look nicer if the build number is not supplied by build TM server.image
Extract test result details into a temp table to format it for the email.image
Send email and print result in output log of RM action.image
Avoid failing the Release Management Action, even if failing tests found when the email send option is set to true. This will make sure deployment completes and the required team members are informed of the Test Results. and give them the option of proceeding or stopping the release pipeline to next steps, after evaluating test results.image
Setup a custom tool in RM using the PowerShell script TcmExec.ps1. 1
If components are already created with the tool they need to be updated with new parameters manually.2
3
Set up the release template to use the test runner with new parameters. All other common issues mentioned at the linked post in the beginning of this post.4
5
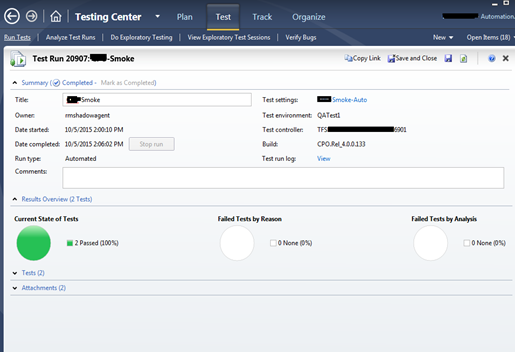
Tests are getting executed in TFS lab environment with RM. 8
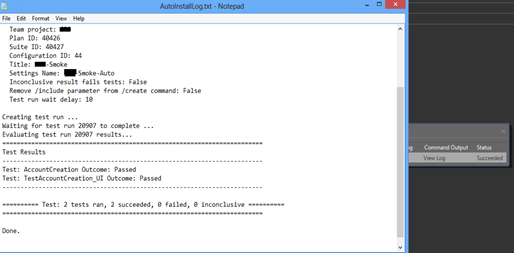
Release management action output log has the details of the test printed.7
Email with the test results sent to the defined recipients.6
You can download the enhanced TcmExec.ps1 from TechNet Gallery.
https://gallery.technet.microsoft.com/Send-Test-Result-Email-5b4f0d5e

VSO as A Cross Platform Capable DevOps Tool – My Tech Talk @ SLASSCOM IT Week

VS Team Services – Work Item Visualization Extension

$
0
0

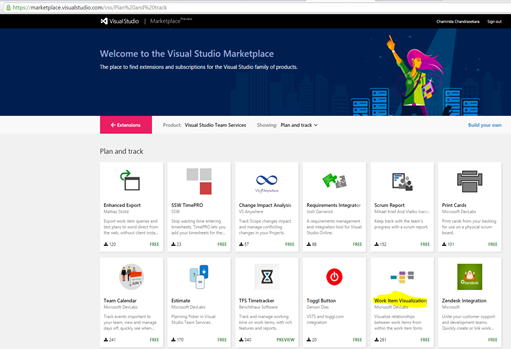
There are many great extensions available for Visual Studio Team Services (former VSO), in the Market Place. One of them is Work Item Visualization Extension. You can add this extension to your Visual Studio Team Services (VSTS) account.

First browse the extension in market place.01

Click on Install.02

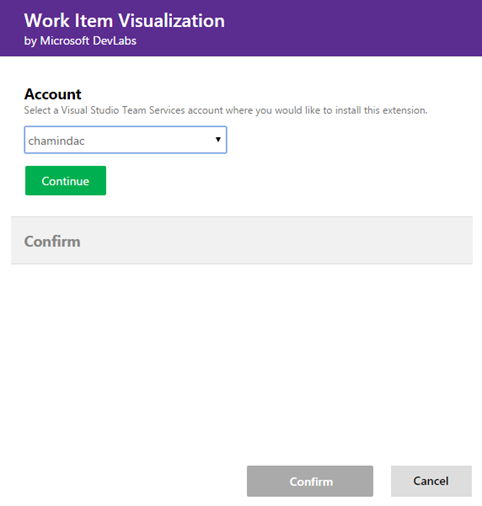
Select the VSTS account.03

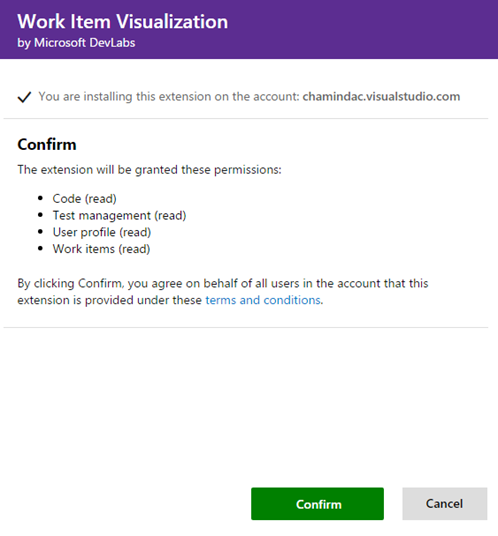
Confirm to install the extension.04 05

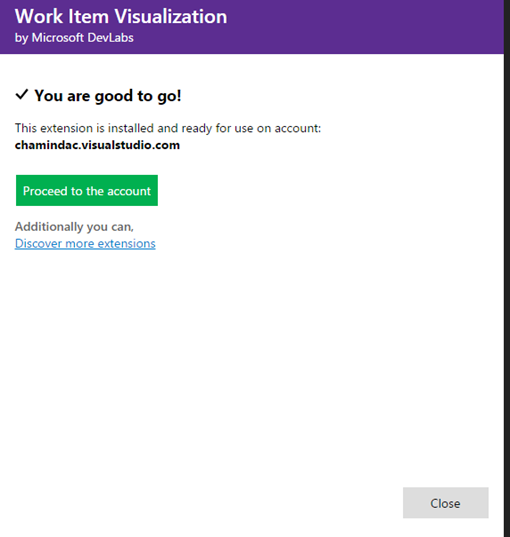
Extension installed for the VSTS account. 06

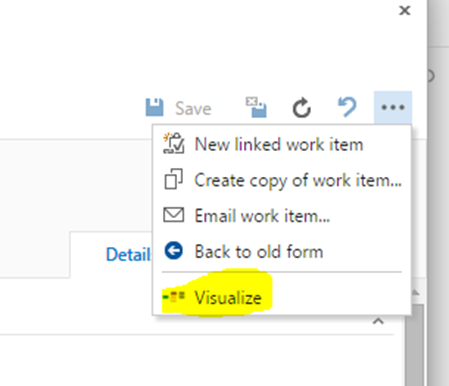
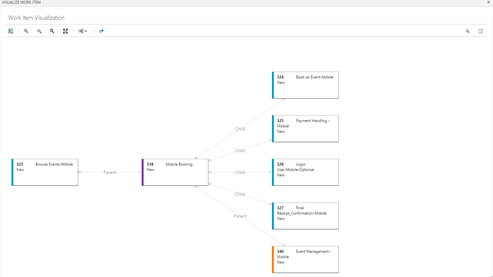
Work items can be visualize with the extension, with drill down capability.06.2

07

Apply Build Number to Assembly Version with New TFS Builds (Build vNext)

$
0
0
To assign the build number as the assembly version, PowerShell script available here can be used. Let’s see how to set this up for TFS builds step by step.
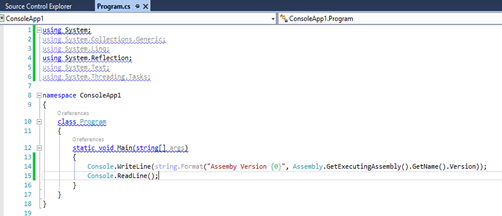
First, a small console application created below as the sample.01
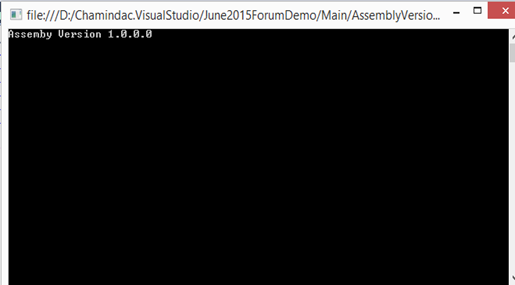
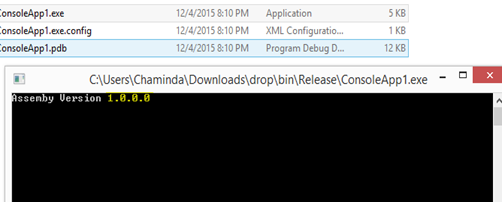
Code segment written to output the assembly version.02 03
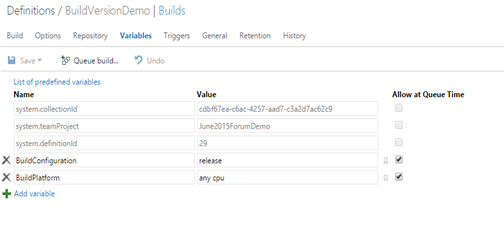
Setup a build in Visual Studio Team Services to build the application. Build number is set to represent version 4.1.3.X (the X is the build number for version 4.1.3). This can be set to match regex pattern "\d+\.\d+\.\d+\.\d+". 04
05.2
Set the repository path05
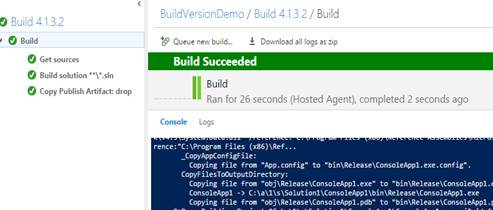
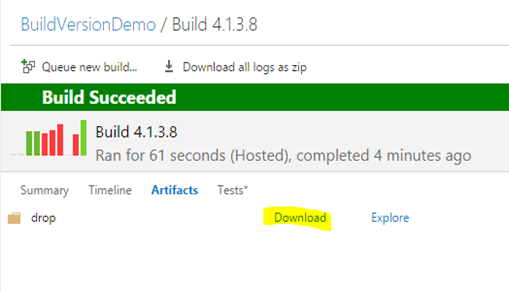
This builds successfully and the build output contains the .exe.06 07 08 09
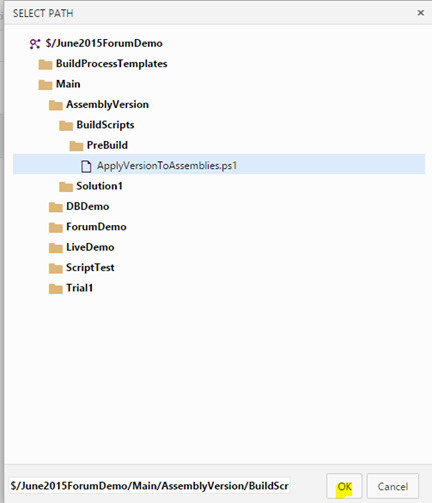
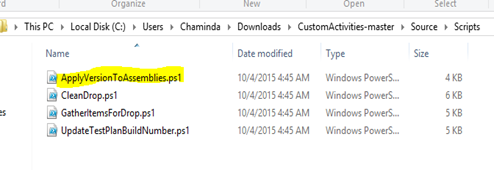
Next download the “ApplyVersionToAssemblies.ps1” from here. Download link can be found in this page.10
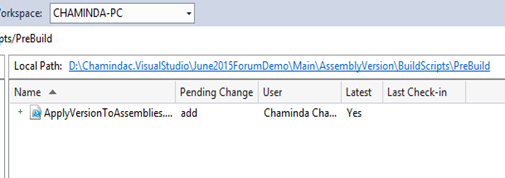
Add the script to the Team Project and check in.11
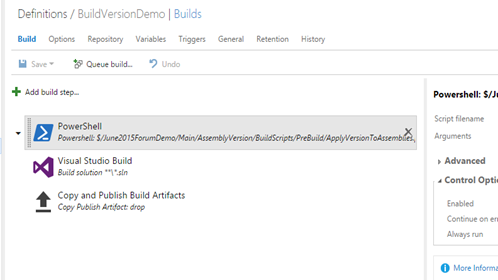
Add new build step to execute PowerShell script.12
Move the added step as the first step.13
Set the script.14 15
16
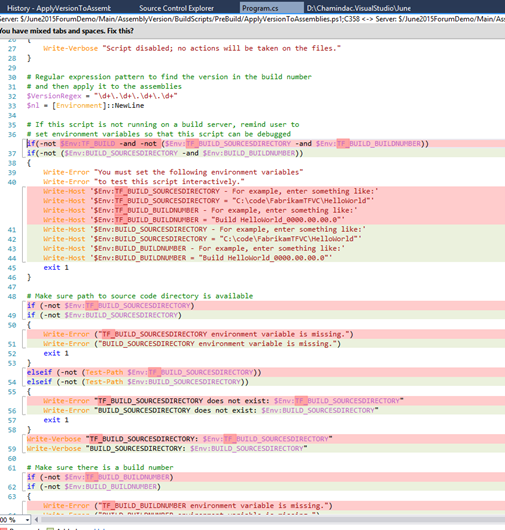
When build script downloaded from github this error occurs due to incorrect environment variable. The script is developed to work with TFS 2013 XAML template builds. The scriptceript should be updated to “$Env:BUILD_SOURCESDIRECTORY”, “$Env:BUILD_BUILDNUMBER”, instead of “$Env:TF_BUILD_SOURCESDIRECTORY”, “$Env:TF_BUILD_BUILDNUMBER”. Remove the “-not $Env:TF_BUILD” condition.18
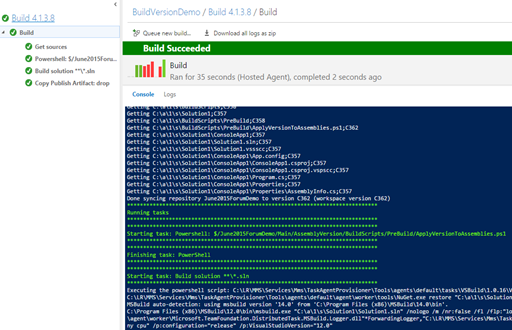
The above changes make the compatible to run with new TFS build. The assemblies now get updated with the build number as version number.19 20
21

Build Java Code with Visual Studio Team Services Using Ant

$
0
0
Visual Studio Team Services (VSTS) has evolved into cross platform capable, great Application Lifecycle Management and DevOps tool. Building java applications with VSTS hosted build services is possible now.
Let’s look at step by step how we can achieve this.
First we need a java code. The below is very simple java code just printing hello world.
1
2
3
4
5
6
7
8
9
/**
* The HelloWorldApp class implements an application that
* simply prints "Hello World!" to standard output.
*/
classHelloWorldAppAnt{
publicstaticvoidmain(String[] args){
System.out.println("Hello World - @ Forum!");// Display the string.
}
}


Check this code in and define a build in VSTS. TO the Build definition add an Ant build step.
Set the repository.
We need an Ant Build xml file to do an Ant build. Simple Ant build file looks like below.
 1
2
3
4
5
6
7
8
9
10
11
12
13
14
15
16
17
18
19
20
21
22
23
24
25
26
27
28
29
30
31
32
33
34
35
36
37
38
39
<projectname="HelloWorld"basedir="."default="main">

<propertyname="src.dir"value="src"/>

<propertyname="build.dir"value="build"/>
<propertyname="classes.dir"value="${build.dir}/classes"/>
<propertyname="jar.dir"value="${build.dir}/jar"/>

<propertyname="main-class"value="HelloWorldAppAnt"/>


<targetname="clean">
<deletedir="${build.dir}"/>
</target>

<targetname="compile">
<mkdirdir="${classes.dir}"/>
<javacsrcdir="${src.dir}"destdir="${classes.dir}"/>
</target>

<targetname="jar"depends="compile">
<mkdirdir="${jar.dir}"/>
<jardestfile="${jar.dir}/${ant.project.name}.jar"basedir="${classes.dir}">
<manifest>
<attributename="Main-Class"value="${main-class}"/>
</manifest>
</jar>
</target>

<targetname="run"depends="jar">
<javajar="${jar.dir}/${ant.project.name}.jar"fork="true"/>
</target>

<targetname="clean-build"depends="clean,jar"/>

<targetname="main"depends="clean,run"/>

</project>

More information on Ant build xml files can be found in below links. https://ant.apache.org/manual/tutorial-HelloWorldWithAnt.htmlhttps://ant.apache.org/manual/using.html
Add this file to source control.
Specify the path to Ant build file in the Ant build step.
Add a publish step to enable downloading contents of the build.
Now a build can be queued and it will build the java code in to runnable bytecode (.class). This build output can be downloaded as shown below.
The byte code can run with “java classname” in command prompt.
.jar file can be run with “java –jar jarfilename” in command prompt.

Part 1 Build ASP.Net 4 Web Site - Deploying to Azure Web Site with Visual Studio Team Services Release

$
0
0
Visual Studio Team Services now has Release Managment Services available as public preview. As the fiirst step let’s create a simple ASP.Net 4 MVC web site and build it with Visual Studio Team Services builds.image
For the build we are going to add two steps. A Visual Studio Build Step and a Publish Artifacts step. Visual Studio Build step will build the solution and Publish Artifacts step will make the build contents available for download (or deploy via release services).image
In visual studio build step you can set the parameters as shown below. image
Solution specifies the solution to build. MSBuild arguments specified to package the web site as a single web deployment package.
/p:DeployOnBuild=true /p:WebPublishMethod=Package /p:PackageAsSingleFile=true /p:SkipInvalidConfigurations=true /p:PackageLocation="$(build.stagingDirectory)"
  • /p:DeployOnBuild=true/p:WebPublishMethod=Package tells the build to create a web deployment package after the build
  • /p:PackageAsSingleFile=true tells the build to create the package as a single zip file
  • /p:SkipInvalidConfigurations=true tells the build to generate a warning if the build encounters an invalid configuration
  • /p:PackageLocation="$(build.stagingDirectory)" tells the build to create the build out put in temporary staging directory. Files in this location will be overridden when next build happens.
  • $(build.stagingDirectory) is a Predefined Variable and more information on such variables can be found here.
For Platform and Configuration, variables can be defined in the Variables tab as shown below and can be used in the Visual Studio Build step. image
In Publish Artifacts step, for the Copy Root specify $(build.stagingDirectory), so that the step can find the contents from the temporary build staging location. Contents can be specified and here it is set to copy all zip files. Multiple arguments can be provided for the Contents, and each argument should be in a separate line. Artifact Name can be specified as your preference, and Artifact Type here set to Server. It can be set to a “File share”. Then accessible shared location should be available for the build services.image
Once a build is queued with above steps set, it will build successfluy and will make the build artifacts availablae for downloading. image
image
Downloaded output containes the web deployment package. image
In the next post, I will explain how to use this build to create a Release Pipeline, using Visual Studio Team Services – Release, to deploy to Azure Web Apps.

Link Azure Subscription to Visual Studio Team Services Team Project

$
0
0
Inorder to Team Project in Visual Studio Team Services, to use Azure Deployment in build and deployment tasks,  Azure Susbscriptions should be linked to VS Team Service. To link a subscription you can go to team project manage area by clicking on cog wheel icon and going to services tab.image
image
You can navigate to same by clicking on any Azure related build/release tasks Manage link.image_thumb34
image
Click on New Service Endpoint and select Azure.image_thumb36
Click on link to download subscription publish settings file. Log in to your Azuer subscription and file will be downloaded.image_thumb40
image_thumb43
image_thumb41
Or you can
  • Open a Microsoft Azure PowerShell window
  • Type Get-AzurePublishSettingsFile
  • This will open a browser and automatically download your subscription file.
Open the subscription file named “SubscriptiionName.Date-credentials.publishsettings” and locate the SubscriptionId and ManagementCertificate elements.image_thumb51
This will link your Azure subscription to VS Team Services Team Project.image_thumb53

Part 2 Deploy ASP.Net 4 Web Site - Deploying to Azure Web Site with Visual Studio Team Services Release

$
0
0
We have successfully built and produce downloadble build output in the Part 1 Build ASP.Net 4 Web Site. Let’s look at how we can setup a Release Pipeline with Visual Studio Team Services Release Management, to deploy this web site as an Azure Web Application.
Click green + to create a new release definition.image
Select Azure WebSite deployment and click Ok in the dialog box.image
This will create an environment with Azure Web App Deployment task. Rename the environment added to let’s say DevInt. image
In the Artifacts tab of the release definition, click on Link an artifact source.image
Select the build we have created in Part1.image
image
In Azure Web App Deployment task set the parameters as shown below.image
To link Azure Subscription to your VS Team Services Team Project follow the instructions here. Web App Name is the Azure Web App Name. Use the App Service Location as the Web App Location.image
image
Select Deploy Package from linked artifact. How to publish build artifact is explained in Part1.image
Trigger can be set to Continuous Deployment so that new artifact availability will trigger a deployment. image
Approvers can be assigned but let’s keep it automated. image
image
Let’s trigger a new build using build definition we have created in Part1.image
image
Once the build done release automatically get triggered and get completed. image
image
image
Site is getting deployed to Azure Web App.image

Add to GAC (Global Assembly Cache) with Poweshell Remoting

$
0
0

Script made available here, by me allows the files to be added to GAC (Global Assembly Cache) in a remote machine, using poweshell (This script was created on a great sample script available in this article, which explaines how to copy files using PowerShell remoting). Script can run on Server A and It can copy required assemblies from Server A, to Server B and then add to GAC in Server B. This can be used in a standalone installer script created with poweshell and can be utilized in Release Management.

In order to run the script first you need to enable powershell remoting in Server B (target remote server). To do that run in Server B.

Enable-PSRemotingimage

Max size issue

When running the script you could run in to max file size default limit per file if your assembly is larger than 10MB.

WARNING: Command failed. Sending data to a remote command failed with the following error message: The current deserialized object size of the data received from remote client exceeded allowed maximum object size. The current deserialized object size is 1057
2800. Allowed maximum object size is 10485760. For more information, see the about_Remote_Troubleshooting Help topic.
image

As explained in this stackoverflow Q&A, run below script in remote target server (Server B), to enable larger files.

Register-PSSessionConfiguration -Name AsmNoLimits #or the name you like.image
Set the max file size to 500MB. this is run in Server B (Target remote server).
Set-PSSessionConfiguration -Name AsmNoLimits ` -MaximumReceivedDataSizePerCommandMB 500 -MaximumReceivedObjectSizeMB 500image
In the script this configuration “AsmNoLimits” used, when creating the remote PowerShell session.image

With this change large files (upto 500MB) can be copied .image

image

Adding to GAC

Below script segment allows adding to GAC in the remote computer (Server B).image

Once executed in Server A, file copied from Server A to B and getting added to GAC in Server B.

dir C:\temp\GAC\*.* | .\AddAssembliesToGac-Remote.ps1 -Computername "dolphintfsa.domainx.local" -Credential "domainx\chamindac" -Passthru -Verboseimage

image

You can download the script from technet gallery.

A sample script to call this script would look like below.image

 1
2
3
4
5
6
7
8
9
10
11
12
13
14
15
16
17
18
19
20
<#
need to execute below in remote computer(Admin PS Window) to enable PS Remote

PS C:\Windows\system32> Enable-PSRemoting

Then execute the below to allow file size more than 10MB

PS C:\Windows\system32> Register-PSSessionConfiguration -Name AsmNoLimits #or the name you like.

PS C:\Windows\system32> Set-PSSessionConfiguration -Name AsmNoLimits ` -MaximumReceivedDataSizePerCommandMB 500 -MaximumReceivedObjectSizeMB 500

AsmNoLimits is used in AddAssembliesToGac-Remote.ps1

#>
$username = "yourdomain\yourdomainuser"
$password = ConvertTo-SecureString"yourPassword" -AsPlainText -Force
$cred = new-object -typename System.Management.Automation.PSCredential `
-argumentlist $username, $password

dir C:\temp\GAC\*.dll | .\AddAssembliesToGac-Remote.ps1 -Computername "YourRemoteMachine" -Credential $cred -Passthru -Verbose

Update Script Timeout in MTM Test Settings

$
0
0

You could run into default script timeout of five minutes, while running scripts before running tests using MTM.

image

image

Error    1/19/2016 11:10:39 AM    The setup batch file on agent machine 'vstfs:///LabManagement/TestMachine/19' exceeded the execution timeout period.    vstfs:///LabManagement/TestMachine/19

How to Resolve

To increase this timeout there is no straight forward way using MTM. However update deployment timeout is explained in here, utilizing the tool created by Aseem Bansal. But setting Script timeout not available with this particular tool.

As explained in this MSDN Q&A, I have made changes to the code downloaded from the post here by Aseem Bansal and improved it to enable setting the Script Timeout for test settings. You can download the new utility from Technet Gallery here, and use it as explained below (VS 2013 source code for the tool available here). 

UpdateTestSettings /collection:<ProjectCollectionUri> /teamProject:<ProjectName> /settingsname:<TestSettingsName> [/bucketSize:<value>] [/deploymentTimeout:<value>] [/scriptTimeout:<value>]

Examples:

UpdateTestSettings /collection:http://abc:8080/tfs/DefaultCollection /teamProject:myProject /settingsname:My2_0_App /bucketSize:200 /deploymentTimeout:600000

UpdateTestSettings /collection:http://abc:8080/tfs/DefaultCollection /teamProject:myProject /settingsname:My2_0_App /bucketSize:200 /deploymentTimeout:600000 /scriptTimeout:900000

UpdateTestSettings /collection:http://abc:8080/tfs/DefaultCollection /teamProjec:myProject /settingsname:My2_0_App /scriptTimeout:900000

Utility improved to provide Test Settings infor before and after update.
 image

How the code is modified

You can download the original code for the utility from the link provided in the post here.

image

image

When this is built with VS 2013 there could be below errors if you do not have VS 2010 in your machine.image

With or without having above errors remove the references for TeamFoundation dlls.image

There is no Microsoft.TeamFoundation.dll for VS 2013. Microsoft.TeamFoundation.Common.dll would add all thats is added previously by Microsoft.TeamFoundation.dll. Add the references to Team Foundation dlls.image

Remove “Read only” from all code files downloaded before change framework.image

Set the framework to 4.5 and you can build the code with VS 2013 successflully.image

Replace the code in Program.cs with the below updated Program.cs code.

  1
2
3
4
5
6
7
8
9
10
11
12
13
14
15
16
17
18
19
20
21
22
23
24
25
26
27
28
29
30
31
32
33
34
35
36
37
38
39
40
41
42
43
44
45
46
47
48
49
50
51
52
53
54
55
56
57
58
59
60
61
62
63
64
65
66
67
68
69
70
71
72
73
74
75
76
77
78
79
80
81
82
83
84
85
86
87
88
89
90
91
92
93
94
95
96
97
98
99
100
101
102
103
104
105
106
107
108
109
110
111
112
113
114
115
116
117
118
119
120
121
122
123
124
125
126
127
128
129
130
131
132
133
134
135
136
137
138
139
140
141
142
143
144
145
146
147
148
149
150
151
152
153
154
155
156
157
158
159
160
161
162
163
164
165
166
167
168
169
170
171
172
173
174
175
176
177
178
179
180
181
182
183
184
185
186
187
188
189
190
191
192
193
194
195
196
197
198
199
200
201
202
203
204
205
206
207
208
209
210
211
212
213
214
215
216
217
218
219
220
221
222
223
224
225
226
227
228
229
230
231
232
233
234
235
236
237
238
239
240
241
242
243
244
245
246
247
248
249
250
251
252
253
254
255
256
257
258
259
260
261
262
263
264
265
266
267
268
269
270
271
272
273
274
275
276
277
278
279
280
281
282
283
284
285
286
287
288
289
290
291
292
293
294
295
296
297
298
299
300
301
302
303
304
305
306
307
308
309
310
311
312
313
314
315
316
317
318
319
320
321
322
323
324
325
326
327
328
329
330
331
332
333
334
335
336
337
338
339
340
341
342
343
344
345
346
347
348
349
350
351
352
353
354
355
356
357
358
359
360
361
362
363
364
365
366
367
368
369
370
371
372
373
374
375
376
377
378
379
380
381
382
383
384
385
386
387
388
389
390
391
392
393
394
395
396
397
398
399
400
401
402
403
404
405
406
407
408
409
410
411
412
413
414
415
416
417
418
419
420
421
422
423
424
425
426
427
428
429
430
431
432
433
434
435
436
437
438
// ---------------------------------------------------------------------------
// <copyright file="Program.cs" company="Microsoft">
// Copyright (c) Microsoft Corporation. All rights reserved.
// </copyright>
// <summary>
// Updates the specified properties in the tcm test settings.
//
// MTM UI does not expose updation of bunch of test settings properties
// but the same can be achieved via the TCM APIs. This utility uses those
// APIs to update the following properties in tcm test settings.
//
// 1. Deployment timeout.
// 2. Bucket size.
// 3. Apartment state.
//
// Introduced ScriptTimeout - Chaminda Chandrasekara 19/01/2016
// </summary>
// ---------------------------------------------------------------------------

usingMicrosoft.TeamFoundation.Client;
usingMicrosoft.TeamFoundation.TestManagement.Client;
usingMicrosoft.VisualStudio.TestTools.Common;
usingMicrosoft.VisualStudio.TestTools.Common.Xml;
usingSystem;
usingSystem.Collections.Generic;
usingSystem.Diagnostics;
usingSystem.Globalization;
usingSystem.Linq;
usingSystem.Reflection;
usingSystem.Text;
usingSystem.Threading;
usingSystem.Xml;

namespaceUpdateTestSettings
{
classProgram
{
staticvoidMain(string[] args)
{
CommandParameters commandParameters;

Console.WriteLine();

// Validate the parameters
ValidateArguments(args, out commandParameters);
Console.WriteLine("Using parameters: {0}", commandParameters);


// Connect to the team project.
TfsTeamProjectCollection collection = new TfsTeamProjectCollection(new Uri(commandParameters.ProjectCollectionUri));
TestManagementService tcmService = collection.GetService<TestManagementService>();
ITestManagementTeamProject teamProject = tcmService.GetTeamProject(commandParameters.ProjectName);
Console.WriteLine("Connected to the team project {0}.", commandParameters.ProjectName);


// Find the specified test settings.
TestRunConfiguration testRunConfiguration = null;
ITestSettings testSetting = FindTestSettings(commandParameters.TestSettingsName, teamProject, out testRunConfiguration);

// Get ScriptTimeout hidden property info
PropertyInfo pInfo = testRunConfiguration.GetType().GetProperty("ScriptTimeout", BindingFlags.NonPublic | BindingFlags.Public | BindingFlags.DeclaredOnly | BindingFlags.Instance);
Console.WriteLine("==============================================================");
Console.WriteLine("Current TestSettings {0} has bucketSize={1}, deploymentTimeout={2}, scriptTimeout={3} and ApartmentState={4}.", testSetting.Name, testRunConfiguration.BucketSize, testRunConfiguration.DeploymentTimeout, pInfo.GetValue(testRunConfiguration, null), testRunConfiguration.ApartmentState);
Console.WriteLine("==============================================================");

Console.WriteLine("Found the testsettings named {0}.", commandParameters.TestSettingsName);

// If it is an update command, then update the settings
if (commandParameters.IsUpdate)
{
UpdateTestSettings(testSetting, testRunConfiguration, commandParameters);
Console.WriteLine("Updated the testsettings.");
Console.WriteLine();
}

// Show the new values to the user

// Reload test configurations after update
FindTestSettings(commandParameters.TestSettingsName, teamProject, out testRunConfiguration);

Console.WriteLine("==============================================================");
Console.WriteLine("Updated TestSettings {0} has bucketSize={1}, deploymentTimeout={2}, scriptTimeout={3} and ApartmentState={4}.", testSetting.Name, testRunConfiguration.BucketSize, testRunConfiguration.DeploymentTimeout, pInfo.GetValue(testRunConfiguration, null),testRunConfiguration.ApartmentState);
Console.WriteLine("==============================================================");
}

/// <summary>
/// Update the tcm test settings as per the specified command-line parameters
/// </summary>
privatestaticvoidUpdateTestSettings(ITestSettings testSetting,
TestRunConfiguration testRunConfiguration,
CommandParameters commandParameters)
{
if (commandParameters.HasBucketSize)
{
testRunConfiguration.BucketSize = commandParameters.BucketSize;
}
if (commandParameters.HasDeploymentTimeout)
{
testRunConfiguration.DeploymentTimeout = commandParameters.DeploymentTimeout;
}
if (commandParameters.HasApartmentState)
{
testRunConfiguration.ApartmentState = commandParameters.ApartmentState;
}
if (commandParameters.HasScriptTimeout)
{
PropertyInfo pInfo = testRunConfiguration.GetType().GetProperty("ScriptTimeout", BindingFlags.NonPublic | BindingFlags.Public | BindingFlags.DeclaredOnly | BindingFlags.Instance);

pInfo.SetValue(testRunConfiguration, commandParameters.ScriptTimeout, null);
}

// Tcm test settings contains the TestRunConfiguration xml which has all the settings information.
// During the update, we update the testRunConfiguration xml in the test settings
//
XmlElement element = LocalXmlPersistence.SaveTestRunConfiguration(testRunConfiguration);
testSetting.Settings = element;

testSetting.Save();
}


/// <summary>
/// Find the parameter test settings on the team project
/// </summary>
privatestatic ITestSettings FindTestSettings(string testSettingsName,
ITestManagementTeamProject teamProject,
out TestRunConfiguration testRunConfiguration)
{
Console.WriteLine("Finding the testsettings named {0}.", testSettingsName);
ITestSettings testSetting = null;
IEnumerable<ITestSettings> testSettings = teamProject.TestSettings.Query("SELECT * FROM TestSettings");

StringBuilder availableSettings = new StringBuilder();
foreach (ITestSettings setting in testSettings)
{
if (string.Equals(setting.Name, testSettingsName, StringComparison.OrdinalIgnoreCase))
{
if (!setting.IsAutomated)
{
Console.Error.WriteLine("Warning!! Ignoring testsettings named {0} (with id {1}) as it is a manual testsettings. You should specify only the automated testsettings.", setting.Name, setting.Id);
continue;
}

testSetting = setting;
break;
}

// We dont want to pick the manual test settings.
if (!setting.IsAutomated)
{
continue;
}
else
{
if (availableSettings.Length > 0)
{
availableSettings.Append(",");
}

availableSettings.Append("\"");
availableSettings.Append(setting.Name);
availableSettings.Append("\"");
}
}

// Throw error if setting is not found.
//
if (testSetting == null)
{
testRunConfiguration = null;

if (string.IsNullOrEmpty(availableSettings.ToString()))
{
thrownewException(string.Format(CultureInfo.InvariantCulture, "No automated testsettings found with name {0}. Additionally there is no automated testsettings available in this project. So create an automated testsettings using 'Microsoft Test Manager' and then try again.", testSettingsName));
}
else
{
thrownewException(string.Format(CultureInfo.InvariantCulture, "No automated testsettings found with name {0}. The available automated testsettings are: {1}", testSettingsName, availableSettings));
}
}

// Load the xml from the txm settings into TestRun configuration
testRunConfiguration = new TestRunConfiguration(testSetting.Name, "dummy");
testRunConfiguration.Load(testSetting.Settings, XmlTestStoreParameters.GetParameters());
testRunConfiguration.Name = testSetting.Name;

return testSetting;
}


/// <summary>
/// Validate the command-line parameters
/// </summary>
privatestaticvoidValidateArguments(string[] args, out CommandParameters commandParameters)
{
if (args.Contains("?", StringComparer.OrdinalIgnoreCase)
|| args.Contains("/?", StringComparer.OrdinalIgnoreCase))
{
ShowHelpMessage();
Environment.Exit(-1);
}

string collectionSwitch = "/collection:";
string projectSwitch = "/teamProject:";
string testSettingsSwitch = "/settingsname:";
string bucketSizeSwitch = "/bucketsize:";
string deploymentTimeoutSwitch = "/deploymentTimeout:";
string scriptTimeoutSwitch = "/scriptTimeout:";
string apartmentStateSwitch = "/apartmentState:";


string projectCollectionUri = null;
string teamProjectName = null;
string testSettingsName = null;
int bucketSize = -1;
int deploymentTimeout = -1;
int scriptTimeout = -1;
ApartmentState apartmentState = ApartmentState.Unknown;

foreach (string argument in args)
{
if (argument.StartsWith(collectionSwitch, StringComparison.OrdinalIgnoreCase))
{
projectCollectionUri = argument.Substring(collectionSwitch.Length);
}
elseif (argument.StartsWith(projectSwitch, StringComparison.OrdinalIgnoreCase))
{
teamProjectName = argument.Substring(projectSwitch.Length);
}
elseif (argument.StartsWith(testSettingsSwitch, StringComparison.OrdinalIgnoreCase))
{
testSettingsName = argument.Substring(testSettingsSwitch.Length);
}
elseif (argument.StartsWith(bucketSizeSwitch, StringComparison.OrdinalIgnoreCase))
{
string bucketSizeValue = argument.Substring(bucketSizeSwitch.Length);
bucketSize = int.Parse(bucketSizeValue);
}
elseif (argument.StartsWith(deploymentTimeoutSwitch, StringComparison.OrdinalIgnoreCase))
{
string deploymentTimeoutValue = argument.Substring(deploymentTimeoutSwitch.Length);
deploymentTimeout = int.Parse(deploymentTimeoutValue);
}
elseif (argument.StartsWith(scriptTimeoutSwitch, StringComparison.OrdinalIgnoreCase))
{
string scriptTimeoutValue = argument.Substring(scriptTimeoutSwitch.Length);
scriptTimeout = int.Parse(scriptTimeoutValue);
}
elseif (argument.StartsWith(apartmentStateSwitch, StringComparison.OrdinalIgnoreCase))
{
string apartmentStateValue = argument.Substring(apartmentStateSwitch.Length);
apartmentState = (ApartmentState)Enum.Parse(typeof(ApartmentState), apartmentStateValue, true);
}
}

bool projectCollectionUriError = false, teamProjectError = false, testSettingsError = false;
if (string.IsNullOrEmpty(projectCollectionUri))
{
projectCollectionUriError = true;
}
elseif (string.IsNullOrEmpty(teamProjectName))
{
teamProjectError = true;
}
elseif (string.IsNullOrEmpty(testSettingsName))
{
testSettingsError = true;
}

if (projectCollectionUriError || teamProjectError || testSettingsError)
{
if (projectCollectionUriError)
{
Console.Error.WriteLine("ProjectCollectionUri argument is not specified");
}
elseif (teamProjectError)
{
Console.Error.WriteLine("TeamProjectName argument is not specified");
}
elseif (testSettingsError)
{
Console.Error.WriteLine("Settingsname argument is not specified");
}

ShowHelpMessage();
Environment.Exit(-1);
}

commandParameters = new CommandParameters(projectCollectionUri, teamProjectName, testSettingsName);
commandParameters.BucketSize = bucketSize;
commandParameters.DeploymentTimeout = deploymentTimeout;
commandParameters.ScriptTimeout = scriptTimeout;
commandParameters.ApartmentState = apartmentState;
}

privatestaticvoidShowHelpMessage()
{
Console.Error.WriteLine("Usage: UpdateTestSettings /collection:<ProjectCollectionUri> /teamProject:<ProjectName> /settingsname:<TestSettingsName> [/bucketSize:<value>] [/deploymentTimeout:<value>] [/apartmentState:<value>]");
Console.Error.WriteLine();
Console.Error.WriteLine("Examples:");
Console.Error.WriteLine("UpdateTestSettings /collection:http://abc:8080/tfs/DefaultCollection /teamProject:myProject /settingsname:My2_0_App /bucketSize:200 /deploymentTimeout:600000 /apartmentState:MTA");
Console.Error.WriteLine();
Console.Error.WriteLine("UpdateTestSettings /collection:http://abc:8080/tfs/DefaultCollection /teamProject:myProject /settingsname:My2_0_App");
Console.Error.WriteLine();
Console.Error.WriteLine("Default values: BucketSize=100 & DeploymentTimeOut=300000 & ApartmentState=STA.");
}


}


/// <summary>
/// Helper class to capture the command-line inputs
/// </summary>
publicclassCommandParameters
{
privatestring m_projectCollectionUri;
privatestring m_teamProjectName;
privatestring m_testSettingsName;

privateint m_bucketSize = -1;
privateint m_deploymentTimeout = -1;
privateint m_scriptTimeout = -1;
private ApartmentState m_apartmentState = ApartmentState.Unknown;


publicCommandParameters(string projectCollectionUri, string teamProjectName, string testSettingsName)
{
Debug.Assert(!string.IsNullOrEmpty(projectCollectionUri), "Project collection uri cannot be empty");
Debug.Assert(!string.IsNullOrEmpty(teamProjectName), "Team Project name cannot be empty");
Debug.Assert(!string.IsNullOrEmpty(testSettingsName), "TestSettings name cannot be empty");

m_projectCollectionUri = projectCollectionUri;
m_teamProjectName = teamProjectName;
m_testSettingsName = testSettingsName;
}

publicstring ProjectCollectionUri
{
get { return m_projectCollectionUri; }
}

publicstring ProjectName
{
get { return m_teamProjectName; }
}
publicstring TestSettingsName
{
get { return m_testSettingsName; }
}

publicint BucketSize
{
get { return m_bucketSize; }
set { m_bucketSize = value; }
}

publicbool HasBucketSize
{
get { return m_bucketSize != -1; }
}

publicint DeploymentTimeout
{
get { return m_deploymentTimeout; }
set { m_deploymentTimeout = value; }
}

publicbool HasDeploymentTimeout
{
get { return m_deploymentTimeout != -1; }
}

publicint ScriptTimeout
{
get { return m_scriptTimeout; }
set { m_scriptTimeout = value; }
}

publicbool HasScriptTimeout
{
get { return m_scriptTimeout != -1; }
}

public ApartmentState ApartmentState
{
get { return m_apartmentState; }
set { m_apartmentState = value; }
}

publicbool HasApartmentState
{
get { return m_apartmentState != ApartmentState.Unknown; }
}

publicbool IsUpdate
{
get { return (HasBucketSize || HasDeploymentTimeout || HasScriptTimeout|| HasApartmentState); }
}


publicoverridestringToString()
{
StringBuilder builder = new StringBuilder();
builder.Append(string.Format(CultureInfo.CurrentCulture, "Collection={0},", m_projectCollectionUri));
builder.Append(string.Format(CultureInfo.CurrentCulture, "TeamProject={0},", m_teamProjectName));
builder.Append(string.Format(CultureInfo.CurrentCulture, "SettingsName={0}", m_testSettingsName));

if (HasBucketSize)
{
builder.Append(",");
builder.Append(string.Format(CultureInfo.CurrentCulture, "BucketSize={0},", m_bucketSize));
}

if (HasDeploymentTimeout)
{
builder.Append(",");
builder.Append(string.Format(CultureInfo.CurrentCulture, "DeploymentTimeout={0},", m_deploymentTimeout));
}

if (HasScriptTimeout)
{
builder.Append(",");
builder.Append(string.Format(CultureInfo.CurrentCulture, "ScriptTimeout={0},", m_scriptTimeout));
}

if (HasApartmentState)
{
builder.Append(",");
builder.Append(string.Format(CultureInfo.CurrentCulture, "ApartmentState={0},", m_apartmentState));
}

return builder.ToString();
}

}
}

Build ASP.Net 5 (RC1 Update1) Project with Visual Studio Team Services Build

$
0
0

Building ASP.Net 4 MVC witth VS Team Services Build and deploying it to Azure web site with VS Team Services Release, is somewhat straight forward. But building an ASP.Net 5 MVC 6 (EF 7) web application with VS Team Services hosted build services, and deploying it with VS Team Services Release, requires some addtional steps.

(Asp.Net 5 is now no more and named as ASP.Net Core 1.0. It is a name change and still the ASP.Net 5 RC1 Update1 is the available version. ASP.Net Core 1.0 is not released yet.)

Let’s look at steps required to build ASP.Net 5 RC1 Update1, MVC 6 web application with Visual Studio Team Services build.

Simple web application with ASP.Net 5 should be created and checked in to TFS.image

CI Build

First try to create a CI build which builds each changeset checked in. Create a build definition and add a Visual Studio Build step.image

When a build is triggered with above defintition it fails giving below error.

C:\Program Files (x86)\MSBuild\Microsoft\VisualStudio\v14.0\DNX\Microsoft.DNX.targets(126,5): Error : The Dnx Runtime package needs to be installed. See output window for more details.image

This is because hosted build server does not have dnx Runtime packages available in it. As explained in article here use the script to download the required packages before build. Slight modification done to support the releative path of the project, with the location of the script in the verision control.image

image

A gobal.json file added to supply the dnx version that is required to dnu restore.image

image

A new build step should be added to execute the Pre Build script, to install the dnx packages using dnu restore.image

Dnx packages (rc1 update1) get installed with the pre build step. image

But the build step still look for beta8 of dnx packages, and dnu restore does not seem to be working.image

To install the latest dnx in the hosted build server, add to “dnvm upgrade -r clr” Pre Build script.image

Because of a missing mistake in the path of the project.json location, in the script below error occured.

CS0234: The type or namespace name 'AspNet' does not exist in the namespace 'Microsoft'image

This error fixed by making sure relative path to the is correct.image

Final script here.

 1
2
3
4
5
6
7
8
9
10
11
12
13
14
15
16
17
18
19
20
21
22
23
24
25
26
# bootstrap DNVM into this session.
&{$Branch='dev';iex ((new-object net.webclient).DownloadString('https://raw.githubusercontent.com/aspnet/Home/dev/dnvminstall.ps1'))}

# load up the global.json so we can find the DNX version
$globalJson = Get-Content -Path $PSScriptRoot\..\..\EventBooking\global.json -Raw -ErrorAction Ignore | ConvertFrom-Json -ErrorAction Ignore

if($globalJson)
{
$dnxVersion = $globalJson.sdk.version
}
else
{
Write-Warning"Unable to locate global.json to determine using 'latest'"
$dnxVersion = "latest"
}

# install DNX
# only installs the default (x86, clr) runtime of the framework.
# If you need additional architectures or runtimes you should add additional calls
# ex: & $env:USERPROFILE\.dnx\bin\dnvm install $dnxVersion -r coreclr
& $env:USERPROFILE\.dnx\bin\dnvm install $dnxVersion -Persistent

# run DNU restore on all project.json files in the src folder including 2>1 to redirect stderr to stdout for badly behaved tools
Get-ChildItem -Path $PSScriptRoot\..\..\EventBooking -Filter project.json -Recurse | ForEach-Object { & dnu restore $_.FullName 2>1 }

dnvm upgrade -r clr

Then works dnu restore and build succeeds.image

image

With CI build the build output is not made available. But for release bbuild we need artifacts to be able to downloaded and deployed with Visual Studio Team Services Release.image

Release Build and Publich Artifacts

Let’s clone this CI build and create a release build. The steps to publish build artifacts for an ASP.Net 5 application is explained here. Using the script available in the article, a modification added to make it work without having a Team Project namea and releative path to project is set.image

Modified script.

 1
2
3
4
5
6
7
8
9
10
11
12
13
14
15
16
17
18
19
20
21
22
23
24
25
26
param($projectName, $buildConfiguration, $buildStagingDirectory)

$VerbosePreference = "continue"
$ErrorActionPreference = "Stop"

&{$Branch='dev';iex ((new-object net.webclient).DownloadString('https://raw.githubusercontent.com/aspnet/Home/dev/dnvminstall.ps1'))}
$globalJson = Get-Content -Path $PSScriptRoot\..\..\EventBooking\global.json -Raw -ErrorAction Ignore | ConvertFrom-Json -ErrorAction Ignore

if($globalJson)
{
$dnxVersion = $globalJson.sdk.version
}
else
{
Write-Warning"Unable to locate global.json to determine using 'latest'"
$dnxVersion = "latest"
}

& $env:USERPROFILE\.dnx\bin\dnvm install $dnxVersion -Persistent

$dnxRuntimePath = "$($env:USERPROFILE)\.dnx\runtimes\dnx-clr-win-x86.$dnxVersion"

#& "dnu""build""$PSScriptRoot\src\$projectName""--configuration""$buildConfiguration"
Write-Warning"Path is $PSScriptRoot\..\..\EventBooking\$projectName"

& "dnu""publish""$PSScriptRoot\..\..\EventBooking\$projectName""--configuration""$buildConfiguration""--out""$buildStagingDirectory""--runtime""$dnxRuntimePath"

THis script is added to source control to a Post Build script folder.image

A build post step added to execute the post build ASP.Net 5 publish step and below arguments passed to script.

-projectName "BookMyEvents" -buildConfiguration $(BuildConfiguration) -buildStagingDirectory $(build.stagingDirectory)

$(build.stagingDirectory) is temporary location to publish and it is a predefined agent build variable.image

image

Above will publish the ASP.net 5 application but it is not available to download yet.To get the published output available to download, add Copy and Publish Build Artifact step. For this specify the $(build.stagingDirectory) as the Copy Root and provide an Artifact Name. Set the Artifact Type to Server.image

Downloaded build artifact containes the published ASP.Net 5 application.image

image

image

In the next post let’s look at how to get the ASP.Net 5 RC1 Update 1 application, deployed as Azure web application using Visual Studio Team Services Release.

ASP.Net 5 (RC1 Update1) Deploy to Azure Website with Visual Studio Team Services Release

$
0
0
How to setup a build with Visual Studio Team Services, for building ASP.Net 5 (ASP.Net Core 1.0 now) is explained in here. Let’s look at steps necessary to create a release pipeline to deploy, ASP.Net 5 website to Azure, with VS Team Service Release.
First requirement is to develop a poweshell script, whcih is capable of deploying, the built ASP.Net package to Azure. Information on how to write such script is available here.image
Script

 1
2
3
4
5
6
7
8
9
10
11
12
13
14
15
16
17
18
19
param($websiteName, $packOutput)

$website = Get-AzureWebsite -Name $websiteName

# get the scm url to use with MSDeploy. By default this will be the second in the array
$msdeployurl = $website.EnabledHostNames[1]


$publishProperties = @{'WebPublishMethod'='MSDeploy';
'MSDeployServiceUrl'=$msdeployurl;
'DeployIisAppPath'=$website.Name;
'Username'=$website.PublishingUsername;
'Password'=$website.PublishingPassword}


$publishScript = "${env:ProgramFiles(x86)}\Microsoft Visual Studio 14.0\Common7\IDE\Extensions\Microsoft\Web Tools\Publish\Scripts\default-publish.ps1"


. $publishScript -publishProperties $publishProperties -packOutput $packOutput
Add this script to version control.image
Modify our release build in previous blog to copy deploy script to build output.image
image
image
Let’s create Azure Web Application as the target.image
image
Site created and ready.image
In Visual Studio Team Services, Release tab create a new empty Release Definition.image
image
To link the release definition to the build created earlier, click on Link to a build definition.image
Select the build definition and link it to release definition.image
Rename the Default Environment to DevInt(Or what ever name you prefer).image
In the DevInt environment create a configuratoin varibale to hold the Azure web site name.image
image
It is possible to set approvers to the stage. So that an approval requires to get the build deploy to the stage/environment DevInt. Let’s set it to autimated and after deployment set a manual approval, to allo get it approved before deploying to next stage/enviornment in the pipeline.image
image
In the release definition add a Azure Powershell task to execute the deployment script. Azure subscription how to link to VS Team Services account can be found here. Set the deployment script to Azure Powershell release task in Dev Intimage
image
For Web Site Name environment variable can be used in the cript arguments.
-websiteName $(WebSiteName) -packOutput $(System.DefaultWorkingDirectory)\Event.Rel\EventRelOutput\image
Eventhough trigger can be set to continuous deployment like below.image
Let’s leave trigger to manua for the time being.image
Now you can trigger a release with the any successful build output you have using the release definition.image
image
image
Build get deloyed to DevInt environment and wait for the post deployment approval.image
DevInt environment site is running now.image
An Improvement to the build number can be made like following.image
Release name format also can be set to use build number for it to be more meaningful.
Release No $(Build.DefinitionName)-$(Build.BuildNumber)-R-$(rev:r)image
Multiple environements in the pipeline can be configured.image
Deployement logs in the pipeline. You can view these logs, while a release is happening.image
Release history can be viewed.image
Release definition change history is available as well t diagnose any issue which might have ocuured with a change to the definition.image
Difference between two defnitions.image
image
New release managment services with VS Team Services is awsome, and let’s explore more in the coming posts.
Viewing all 342 articles
Browse latest View live